November 5, 2026: My Studies & My Courses
New Features
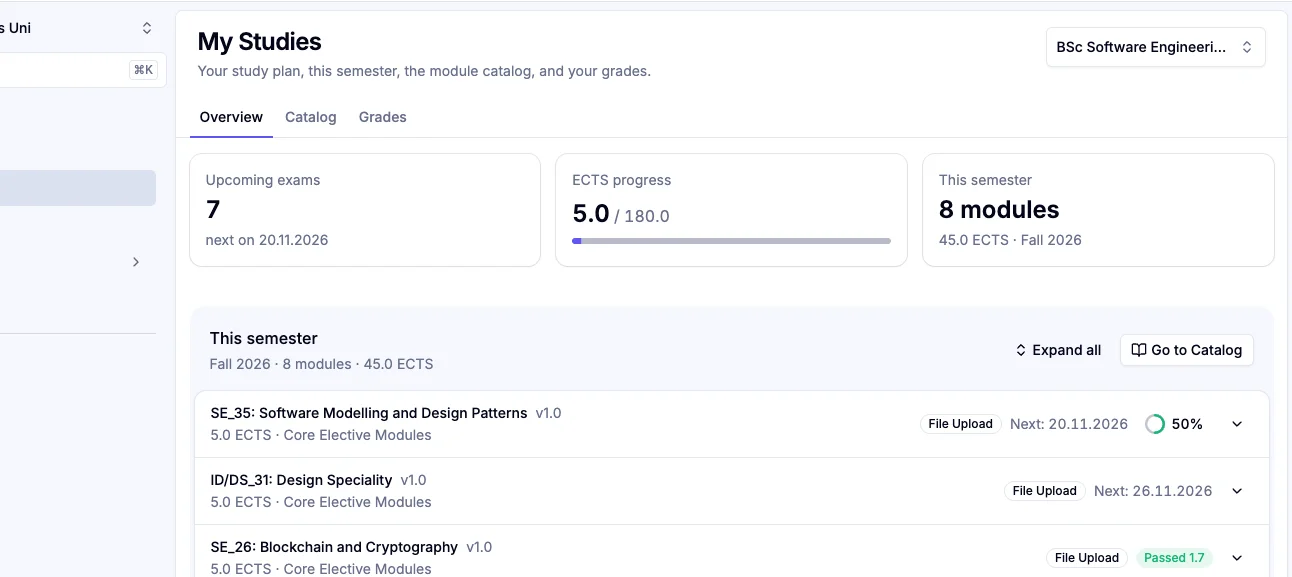
My Studies & My Courses ⭐
Students get two dedicated pages in the user dashboard: a clear study overview and a refreshed course hub for booking, attendance, and learning results.
Key capabilities:
- My Studies – Overview: See this semester at a glance, including your study plan, modules, and upcoming exams.
- My Studies – Catalog: Browse the module catalog for your program without leaving the student view.
- My Studies – Grades: Review your grades in one place, aligned with your study plan.
- Past semesters: Open earlier terms so your full study history stays available.
- My Courses hub: Browse enrolled, waitlist, and bookable courses with search, filters, grouping, and course type.
- Attendance: Follow today’s and this week’s appointments, plus attendance progress by course for the term.
- Learning results: Open learning results for your courses from the same hub.
How to use: Open My Studies or My Courses from the sidebar. In My Studies switch between Overview, Catalog, and Grades; in My Courses use the Courses, Attendance, and Learning results tabs.
Workflow Integrations for n8n, Zapier, and Make
Connect Fuxam to n8n, Zapier, or Make so everyday campus events can start automations in the tools your team already uses.
Key capabilities:
- Three workflow providers: n8n, Zapier, and Make appear as Marketplace cards and share the same outbound webhook setup.
- Large event catalog: Subscribe to 80+ events across courses, content blocks, appointments, users, groups, study programs, modules, curricula, rooms, applications, exams, attendance, tasks, chat, Info Hub, fees, and more.
- Signed deliveries: Each request is signed with a webhook secret so your workflow can verify it came from Fuxam.
- Multiple webhooks: Add several destinations, pick which events each one receives, and edit the URL later.
- Test send: Send a sample event from the webhook detail page and see the response status.
- Secret rotation: Copy the signing secret when you create a webhook, and regenerate or rotate it when needed.
- Activity log: Review webhook create, update, delete, and delivery outcomes on the provider’s Activity tab.
How to use: Go to Settings → Marketplace, open n8n, Zapier, or Make, add a public HTTPS webhook URL from that tool, choose the events you want, save, and send a test. Keep the signing secret in your workflow so it can verify deliveries.
Support Center
Your institution now has a full internal Support Center: staff and students can open tickets, your team can triage and resolve them, and you can escalate to Fuxam when needed.
Key capabilities:
- Create and track tickets: Open tickets with a category and description, attach files, and follow the conversation until they are resolved.
- My requests: Everyone with access can see their own tickets under Support → My requests.
- Queue for your support team: Assign, prioritize, filter, resolve, reopen, and bulk-update tickets in one queue.
- Categories, priorities, and routing: Define categories with icons and default assignees, set priorities with response targets, and route new tickets automatically.
- Comments and attachments: Keep the requester conversation separate from internal notes for your support team.
- Escalate to Fuxam: Forward a ticket to Fuxam Support when you need help, or withdraw the escalation later.
- Feedback channel: Optionally let people submit institution-wide feedback alongside tickets.
- Permissions and analytics: Control who can create or manage tickets, and review volume, resolution time, and category usage.
How to use: Open Support Center from the sidebar. Requesters create tickets or open My requests; support staff work the Queue. Configure categories, priorities, and routing under Settings → Support Center, and grant access under Settings → Roles & Permissions.
Many New Tools for the MCP Server
The MCP server—the connector that lets AI assistants such as Claude or ChatGPT work with Fuxam—now covers far more of the campus. Course content tools were already available; this release adds a large set of new tools across the rest of the product.
Key capabilities:
- Users and roles: Look up and create users, manage groups, notes, availability, and role names from chat.
- Study programs and cohorts: Create and update programs and cohorts, add members, and change cohort curricula.
- Modules and curricula: Create, update, archive, and structure modules and curricula, including versions and connections.
- Study plans: Add, move, remove, and elect modules on a student’s study plan.
- Rooms: Create and update rooms, equipment, locations, catalogs, and imports.
- Calendar and attendance: Create and reschedule appointments and record attendance.
- Exams and applications: Work with exams, grading, deadlines, and application programs, forms, and applicants.
- Tasks, chat, email, Info Hub, and workbenches: Create task batches, post in chat, send email, manage Info Hub, and edit workbenches and smart documents.
How to use: If you already use the MCP Server, reconnect or refresh your AI client so it picks up the new tools. Connect under Settings → Personal → AI as before.
Faster Global Search
Press Cmd+K (or Ctrl+K) for a redesigned search that finds people, courses, appointments, and more, with clearer labels, scoped results, and quicker responses.
How to use: Use the search shortcut anywhere in the app, then pick a result or refine your query.
Smarter User Picker
Choosing people across the app is faster and clearer, with better filters so large institutions can still find the right person quickly.
How to use: Open any user picker (for example when assigning staff, inviting users, or adding recipients) and search or filter as usual.
Pinned Bulk Actions on Tables
When you select rows in major tables, bulk actions stay pinned on the selection bar so you always see what you can do next.
How to use: Select one or more rows in Campus management tables such as applicants, exams, or users; the actions stay visible on the selection bar.
Clearer Invitations & Activation
Inviting users and activating accounts is more reliable, with clearer status labels and a smoother path for people who already have an account.
How to use: Invite people from Campus management → User management, or share an invite link; invited users complete activation from the email or sign-up flow.
Room Locations on the Map
Organize rooms by location (campus or building), assign rooms from the locations table, and preview a location on the map.
How to use: Go to Campus management → My Organization → Rooms, open the Locations tab, create locations, and assign rooms from the table.
Smoother Course Load Management
Course load changes can be staged and saved together, cohorts stay attached when you add a course, and Smart Plan only opens for courses already on the page.
How to use: Open Campus management → My Organization → Course Load Management, make your edits, then save once.
Exam Roster Export & Inability Handling
Export pending exam participants to a spreadsheet, and schedule a free inability on the next attempt when an attempt should not count.
How to use: In Campus management → Exam Center, open an exam’s participant list to export, or record an inability decision when reviewing attempts under My Exams.
Application Notes & Program Duplicates
Staff can leave internal notes on application forms and question catalog blocks, separate unsubmitted applications, and duplicate an application program from the forms list.
How to use: Open Campus management → Application management. Add notes on the Forms tab or question catalog; use Duplicate on a program in the forms list.
Simple Tasks
You can send a straightforward task with written instructions and optional files—no special form or document template required.
How to use: In Campus management → User management → Tasks, create a batch, choose the simple task type, add instructions and files, then send to recipients.
Curriculum Versions
Curricula support versioning so you can evolve a program over time while keeping older versions available where needed.
How to use: Open Campus management → My Organization → Curricula and work with curriculum versions from the curriculum pages.
Module Main Description
Each module version can carry a main description, and pasted markdown is formatted for you.
How to use: Open a module under Campus management → My Organization → Modules and edit the main description on the module version.
Improvements
Faster Loading Across the App
Many pages—especially Settings, planning, documents, exams, and the home dashboard—show placeholders that match the real layout, so the screen no longer jumps while content loads.
Configuration Wizard Updates
The configuration wizard helps you finish setup with clearer steps and updated guidance.
Preferred Name & Gender Permissions
Preferred name and gender can be permissioned separately from basic profile fields.
Longer Password Reset Links
Password reset links now stay valid for 24 hours.
Default User Address
You can set a default address for users to speed up common profile and form scenarios.
Optimized Breadcrumbs
Going back from a detail page keeps the parent table’s filters and position whenever possible.
Jump from Course Chat to the Course
From the main lobby channel title of a course chat, you can open the course directly.
Smart Document Improvements
The document editor gains clearer text color, alignment, table handling, and image layout for templates and filled documents.